

Organisation settings apply to all clusters and resources within your organisation. Only administrators can modify these settings.
Accessing Organisation Settings
- Click your profile icon in the bottom left corner of the Ankra platform.
- Select Organisation from the menu.
- Click Settings in the organisation view.
- Navigate to General to access these settings.
General Settings
Organisation Name
Change the display name of your organisation. This name appears throughout the platform and helps identify your workspace.1
Navigate to Settings
Go to Organisation Settings → General.
2
Edit the Name
Enter a new name in the Organisation Name field.
3
Save Changes
Click Save Changes to apply.
Only administrators can rename organisations. Members will see the rename option disabled.
Agent Settings
Configure default agent behaviour for all clusters in your organisation.Auto-upgrade Agents
When enabled, cluster agents automatically upgrade to the latest version when available. This ensures your clusters stay up-to-date with security patches and new features.
How Auto-upgrade Works:
- Ankra releases a new agent version
- The platform detects clusters running older versions
- If auto-upgrade is enabled (and the cluster hasn’t opted out), the agent is upgraded automatically
- The upgrade process is seamless with minimal disruption
AI settings
Ankra’s AI has its own settings area: open AI → Settings. Proactive insights, models and cost, connections to Slack, Teams and source control, and how much the AI may do on its own are all set there, not in Organisation Settings. See Ankra AI for what each setting controls, and AI Insights to turn on proactive cluster analysis.DNS Records
Organisation admins can create manual CNAME, A, and TXT records under your organisation’s own delegated Ankra subdomain (underankra.cc by default, or the Ankra domain your organisation selected) - useful for aliasing an add-on’s auto-generated hostname to something memorable.
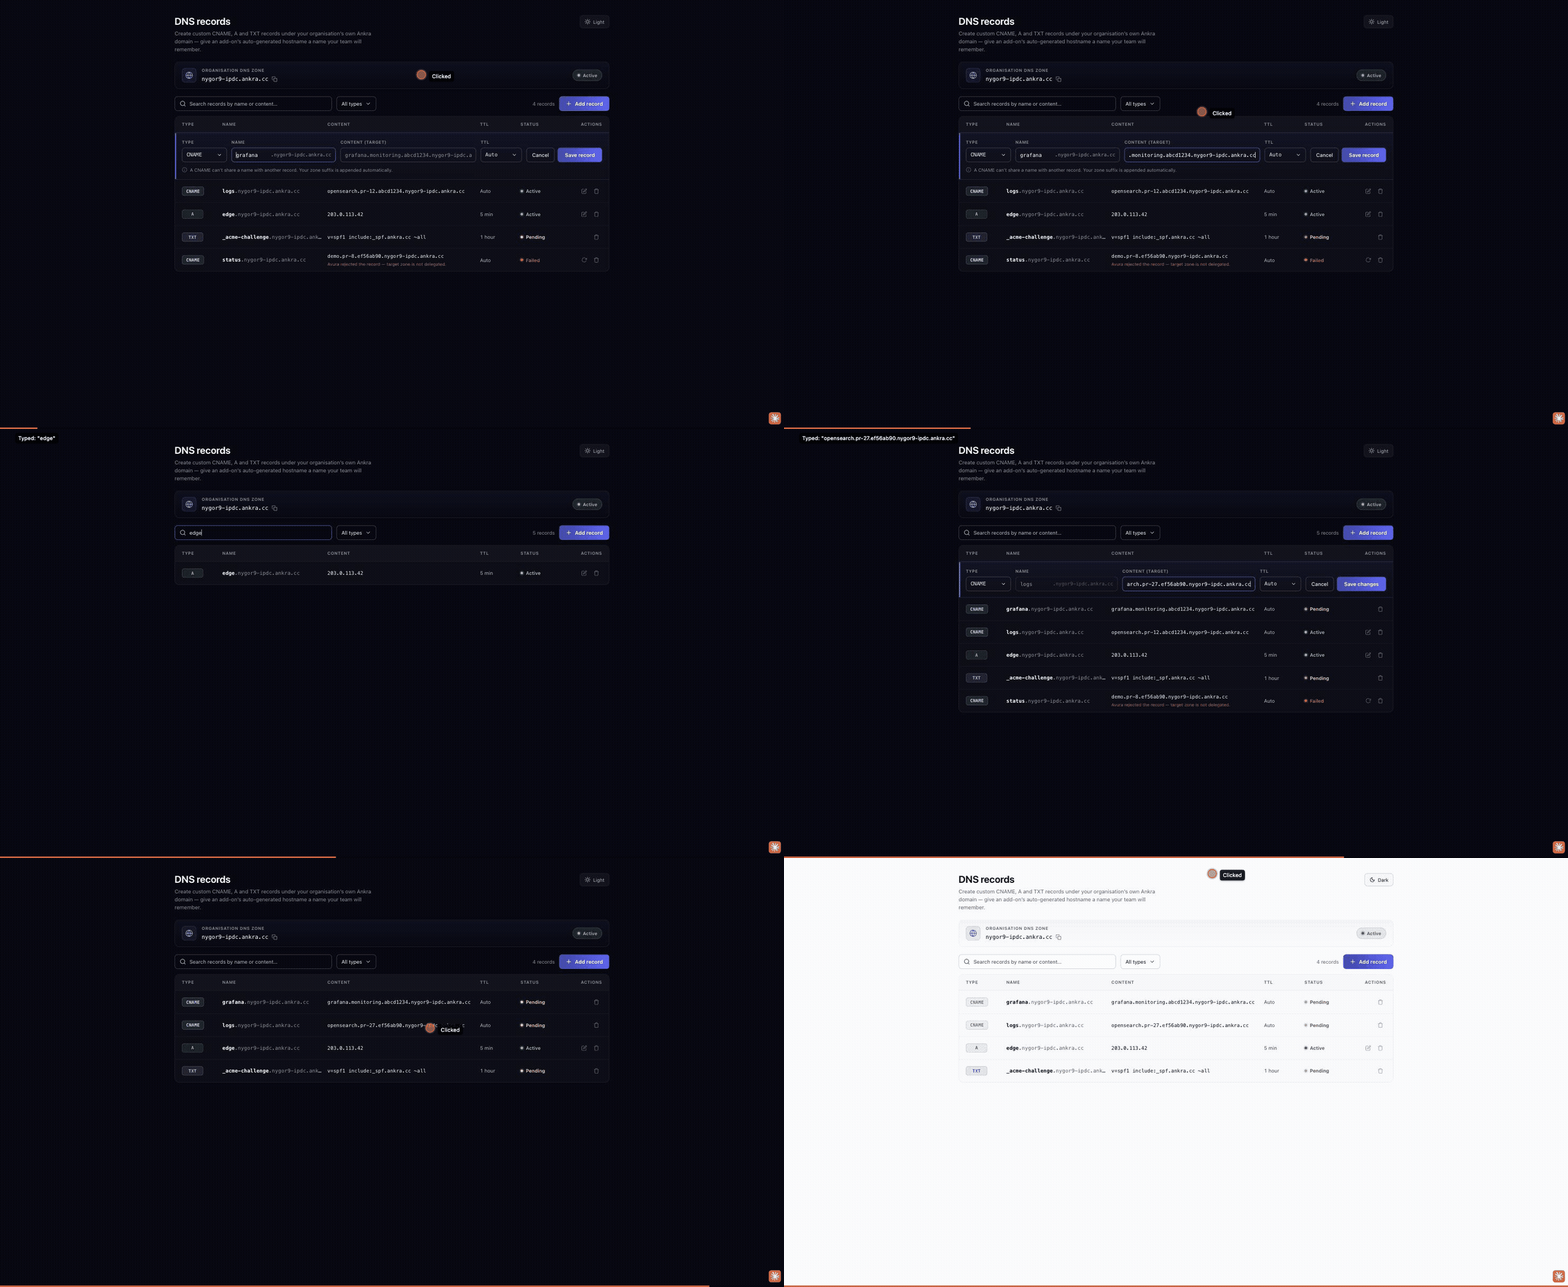
Adding, searching, editing, and deleting DNS records in the organisation console
1
Navigate to DNS Records
Go to Organisation Settings → DNS records.
2
Add a record
Click Add record, enter a label (for example
logs), pick a record type (CNAME, A, or TXT), enter the target, and choose a TTL (Auto, or 1 minute up to 1 hour). Your organisation’s zone is appended to the label automatically.3
Track its state
New records provision asynchronously and show as Pending until the record is live in DNS (Active), or Failed with the reason if provisioning didn’t succeed.
4
Edit or delete a record
Use the row actions to edit a record’s target and TTL in place, or delete it. Editing re-points the record and returns it to Pending until the change is live. To change a record’s name or type, delete it and add a new one.
Cluster domains
The same page lists every cluster’s own delegated Ankra domain (<cluster-id>.<org-id>.<ankra-domain>) with its provisioning state. Remove hands a cluster’s domain back for teardown - the step required on every cluster before switching the organisation’s Ankra domain - and Enable domain brings a cluster (back) under the organisation’s current Ankra domain; external-dns picks a newly enabled domain up on the cluster’s next cloud-provider pass.
external-dns on a cluster manages that cluster’s Ankra domain and nothing else. The credential Ankra provisions when you create a cluster with public DNS included is scoped to
<cluster-id>.<org-id>.<ankra-domain>, so an Ingress on any other zone - one of your own domains, or another cluster’s - is filtered out by the DNS provider before a record is written. The sync still logs All records are already up to date, because from external-dns’s point of view there is nothing in scope to publish, so a hostname being dropped looks the same as one being current.Ingress hostnames on your own domains therefore need a publisher of their own, and an unpublished name also delays cert-manager: an HTTP-01 challenge is answered over the hostname being certified, so no certificate is issued for a name that does not resolve yet. Declare the zone with your own DNS credential - once, for every cluster in the organisation - and Ankra runs a second, zone-pinned external-dns for it on each cluster: see serving a zone in your own DNS account from every cluster. A domain held in Avura is added from Custom domains → Add domain with Avura as the provider, and its records are managed under Settings → Avura: see use Avura domains with Ankra.When the declared zone covers the organisation’s Preview domain, that domain becomes the cluster’s public domain: ${{ ankra.cluster_domain }} in stacks and profiles, Ankra AI’s hostname advice, the deploy wizard’s default hostname and ankra cluster domain all report it instead of the generated Ankra domain, and the “hostnames will not resolve” warning on the Preview domain clears.Any organisation member can view the record list; only administrators can add, edit, or delete records. A record’s own zone must be active before a record can be created under it - new organisations provision this automatically, and the DNS records page shows the zone and its status at the top.
A CNAME record can never share a name with another record (standard DNS behaviour), and each name/type pair can only have one record.
Danger Zone
Delete Organisation
Permanently remove your organisation and all associated data, including:- All clusters (disconnected, not deleted from your infrastructure)
- All stacks and configurations
- All credentials and integrations
- All user memberships
1
Navigate to Danger Zone
Go to Organisation Settings → General and scroll to the Danger Zone section.
2
Click Delete
Click the Delete button. Only administrators see this option.
3
Confirm Deletion
Type the organisation name exactly as shown to confirm, then click Delete Organisation.
Related Settings
Variables
Define organisation-wide variables for use in stacks.
Encryption (SOPS)
Configure SOPS encryption for your organisation.
Cluster Settings
Configure individual cluster settings.
DNS Records
Create custom CNAME, A, and TXT records under your organisation’s Ankra subdomain.
User Management
Invite users and manage roles.